

Như trong bài viết trước, bạn đã cài đặt thành công theme React WordPress và hiểu được các cấu trúc trong theme React WordPress.
Trong bài viết náy sẽ chia sẻ cách xây dựng các component, route ... thông qua 3 thư mục chính:
- templates
- partials
- context
Trong đó templates sẽ là nơi chứa các file templates như Single.js và Archive.js. Single sẽ hiển thị các bài đăng (post) và Archive sẽ hiển thị các post thời gian.
Đây sẽ là bài viết thứ 2 của một loạt các bài viết:
Phần 1 - Cài đặt và tìm hiểu về theme React WordPress
Phần 2 - Xây dựng component, route và context trong theme React WordPress
Phần 3 - Vòng lặp, phân trang trong theme React WordPress
Tạo Route cho theme React WordPress
Để bắt đầu, chúng ta cần khởi động development mode bằng lệnh:
npm run wpstartTạo một fìle chứa component gọi là "Single" trong templates có nội dung:
import React from 'react';

const Single = (props) => {
  return (
        <div className="Post">
            this is the page component
        </div>
  )

}
export default Single
Để sử dụng route bạn cần cài đặt package react router bằng lệnh
npm install react-router-domMở file index.js và include react router
import { BrowserRouter, Switch, Route } from 'react-router-dom';Bên trong render function ta sửa lại như sau
ReactDOM.render(
<BrowserRouter>
<Switch>
<Route path='/page' component={Single}/>
</Switch>
</BrowserRouter>, document.getElementById('root')
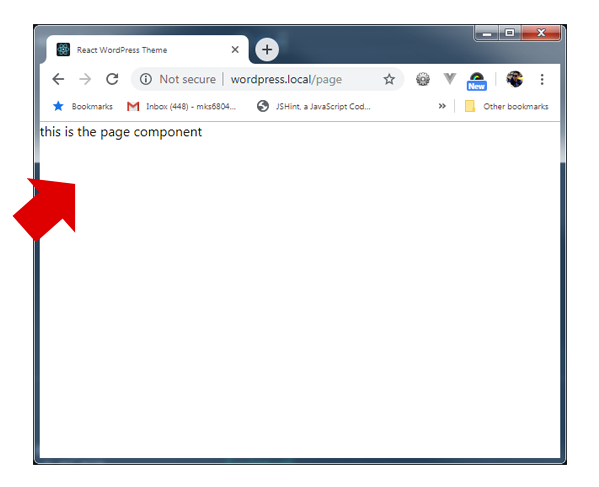
);Bây giờ bạn thử truy cập vào path "/page" sẽ nhận thấy component page của bạn được render như hình
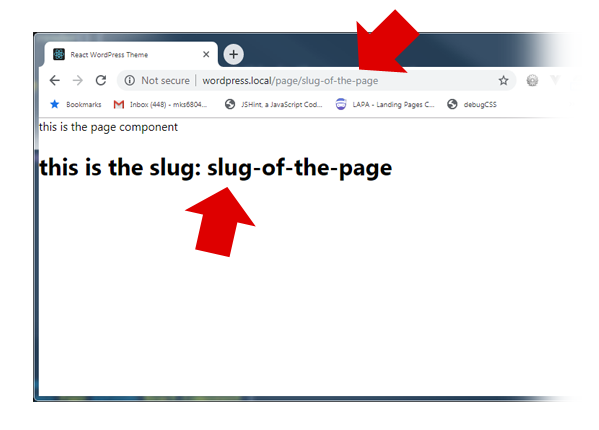
Trở lại index.js để sửa lại như sau
<Route path="/page/:slug" component={Single} /> Lưu ý: ở đây :slug là slug thực của wordpress
Để thấy rõ về slug bạn có thể thay thế và thử lại ở component single như sau
<h1>this is the slug: {props.match.params.slug}</h1>bạn sẽ thấy kết quả như sau
Bây giờ,Chúng tôi sẽ thêm các tuyến đường sau:
- Trang chủ - nối với component “Archive”
- Trang + slug - nối đến component "Single"
- Post + slug - component "Single"
- Tìm kiếm + cụm từ - component “Archive”
- 404 - component “Notfound”
Sao chép file Single thành Archive, Notfound. Sau đó, hãy kết hợp nó với các route ở trên trong index.js. Index.js của chúng tôi bây giờ trông giống như dưới đây:
import React from 'react';
import ReactDOM from 'react-dom';
import { Route, BrowserRouter as Router, Switch } from 'react-router-dom'
import './index.css';
import Archive from './templates/Archive';
import Single from './templates/Single';
import Notfound from './templates/Notfound';

const routes = (
    <Router>
      <Switch>
           <Route exact path="/" component={Archive} />
           <Route path="/page/:slug" component={Single} />
           <Route path="/post/:slug" component={Single} />
           <Route path="/search/:term" component={Archive} />
           <Route component={Notfound} />
      </Switch>
    </Router>
  )

ReactDOM.render(routes, document.getElementById('root'));
Xây dựng các Partials cần thiết cho React WordPress
Partials là các component sẽ được tái sử dụng nhiều lần cho các route component. Như là header, footer, sidebar hay bất cứ component có thể sử dụng nhiều lần.
Ở đây chúng ta sẽ tạo 2 component partials là Head.js và Foot.js. Mỗi partitals sẽ có code như sau
/******Head.js*************/

import React from 'react'
function Head(){
    return (<div className="header">header</div>)
}
export default Head;
và Foot.js
/******Foot.js*************/
import React from 'react'
function Foot(){
return (<div className="footer">footer</div>)
}
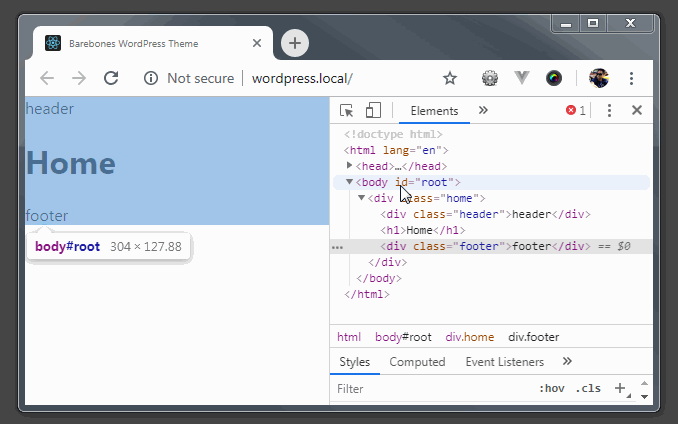
export default Foot;Bây giờ chúng ta import chúng vào Single
import React from 'react'
import Head from '../partials/Head';
import Foot from '../partials/Foot';

const Single = (props) => {
    return (
        <div className="Post">
            <Head></Head>
            <h1>Home</h1>
            <Foot></Foot>
        </div>
    )
}
export default Single
Trong browser lúc nãy sẽ trông như thế này
Tương tự làm điều đó với các template còn lại để chúng có thể xuất hiện ở tất cả các trang.
Xây dựng dữ liệu React WordPress - Context (Data)
Context React là nơi chứa dữ liệu của React, nó cho phép bạn xây dựng kho lưu dữ liệu tập trung để truyền dữ liệu qua các child component ( component con)
Bắt đầu với Context.js - file sẽ gọi là "Provider" với đoạn code dưới:
import React from "react";

const storeContext = React.createContext();
export const Consumer = storeContext.Consumer;

export class Provider extends React.Component {
  constructor(props) {
    super(props);
     this.state = {
      posts : []
    };
  }

 componentDidMount(){
    this.setState({
       posts : ['title','title2']
    })
 }

 componentDidUpdate(prevProps){
    //more code here later...
 }
 render() {
    return (
      <storeContext.Provider value={this.state}>
        {this.props.children}
      </storeContext.Provider>
    );
  }
}
Tiếp theo ta tạo một WithConsumer.js như sau
import React from "react";
import { Consumer } from "./Context";

function WithConsumer(WrappedComponent) {
  return function(props) {
    return (
      <Consumer>
        {ctx => <WrappedComponent {...props} context={ctx} />}
      </Consumer>
    );
  };
}

export default WithConsumer;
Về cơ bản, tất cả các components của chúng ta sẽ “sử dụng” dữ liệu từ “Provider” từ file này.
Bây giờ chúng ta tạo thêm một partial là "TheLoop"
import React from 'react';
import WithConsumer from '../context/WithConsumer';

const TheLoop = ({ context }) => {
    const posts = () => context.posts;
    const pos = posts();

    return (
       pos.map(function(item,i){
         return <div key={i}>{item}</div>
       })
    );
};
export default WithConsumer(TheLoop);
Lưu ý rằng trong quá trình export của chúng ta - chúng ta đang chuyển thành phần TheLoop của mình làm tham số cho WithConsumer .
Chúng ta sẽ nói chi tiết hơn về thành phần TheLoop trong phần tiếp theo của chúng ta. Hiện tại, chúng tôi chỉ muốn thiết lập và chạy nó thử nghiệm.
Sửa lại file Single.js
import React from 'react';
import Head from '../partials/Head';
import TheLoop from '../partials/TheLoop';
import Foot from '../partials/Foot';
import {Provider} from '../context/Context'

const Single = (props) => {
  return (
    <Provider>
    <div className="Post">
      <Head></Head>
      <TheLoop></TheLoop>
      <Foot></Foot>
    </div>
    </Provider>
  )
}

export default Single
Bạn thấy cách chúng tôi gói mọi thứ trong “ <Provider> ”, đây là vì vậy chúng tôi có quyền truy cập vào dữ liệu Context.js của mình. Ngoài ra, chúng tôi đã bao gồm " TheLoop " như một thành phần ở giữa Head và Foot .
Bây giờ bạn sẽ thấy “title” và “title2” trong trình duyệt.
Cuối cùng, chúng ta cần một cách để đưa thông số “slug” vào context của chúng ta. Chúng ta có thể sử dụng props cho điều đó. Vẫn trong Single.js ta sửa lại như sau:
<Provider router={props}>Trong Context.js , chúng ta sẽ có quyền truy cập vào slug - thông qua “ props.router.match.params.slug “.
Chúng ta tạm dừng tại đây để tìm hiểu Loop và Axios trong phần tiếp theo.
Download full source tại phần 3.
Xem tiếp : Tạo theme Wordpress bằng React - Phần 1
Xem tiếp : Tạo theme Wordpress bằng React - Phần 3