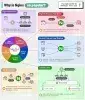

LEMP stack là gì ?
LEMP là tên viết tắt của 4 kí tự đầu trong bộ cài đặt bao gồm: Linux, NGINX, MariaDB, PHP. (chữ NGINX đọc là “Engine X” nên chữ E được lấy từ đây.)
LEMP là một ứng dụng HTTP proxy tuơng tự như là LAMP nhưng không có được nổi danh như Apache, tuy vậy, nó có ưu điểm là cho phép xử lý tốc độ tải cao hơn đối với các HTTP request.
Stack Lemp gồm
+ Linux: là lớp đầu tiên trong stack. Hệ điều hành này là cơ sở nền tảng cho các lớp phần mềm khác.
+ NGINX: đóng vai trò một HTTP server dùng để xử lý các yêu cầu gửi tới máy chủ
+ MariaDB: là một cơ sở dữ liệu để lưu trữ mọi thông tin trên website
+ PHP: sẽ xử lý các nhiệm vụ cần thiết hoặc kết nối với CSDL để lấy thông tin cần thiết sau đó trả về cho máy khách (Client)
Hướng Dẫn Cài đặt LEMP trên CentOS 7
Bước 1: Cập nhập bản mới nhất của CenOS7
yum update -y && yum install nano -yBước 2: Cài đặt Repo cần thiết cho CenOS7
2.1. CentOS 7 EPEL repository
yum install epel-release2.2. CentOS 7 Remi repository
rpm -Uvh http://rpms.famillecollet.com/enterprise/remi-release-7.rpm2.3. CentOS 7 Nginx repository
rpm -Uvh http://nginx.org/packages/centos/7/noarch/RPMS/nginx-release-centos-7-0.el7.ngx.noarch.rpmBước 3: Cài đặt NGINX
yum install -y nginxBước 4: Cài đặt PHP và Module
Cài đặt và Enable PHP 7.3
yum-config-manager --enable remi-php73
yum install -y php php-fpm php-commonCài đặt các module cần thiết:
+ APCu (php-pecl-apc) – APCu userland caching
+ CLI (php-cli) – Command-line interface for PHP
+ PEAR (php-pear) – PHP Extension and Application Repository framework
+ PDO (php-pdo) – A database access abstraction module for PHP applications
+ MySQL (php-mysqlnd) – A module for PHP applications that use MySQL databases
+ Memcache (php-pecl-memcache) – Extension to work with the Memcached caching daemon
+ XML (php-xml) – A module for PHP applications which use XML
+ MBString (php-mbstring) – A module for PHP applications which need multi-byte string handling
Ta dùng lệnh :
yum install -y php-pecl-apcu php-cli php-pear php-pdo php-mysqlnd php-pecl-memcache php-pecl-memcached php-mbstringBước 5: Cài đặt MariaDB
5.1. Cài đặt MariaDB
yum install -y mariadb mariadb-server5.2. Bật khi khởi động MariaDB
// lệnh bật MariaDB
systemctl start mariadb.service
//Lệnh tự động bật khi khởi động
systemctl enable mariadb.service
5.3. Cài đặt ban đầu và cấu hình mật khẩu cho user root MariaDB
mysql_secure_installationThực hiện các câu hỏi tiếp theo khi chạy lệnh :
Enter current password for root (enter for none): Enter

Set root password? [Y/n] y

New password:

Re-enter new password:

Password updated successfully!

Remove anonymous users? [Y/n] y

Disallow root login remotely? [Y/n] y

Remove test database and access to it? [Y/n] y

Reload privilege tables now? [Y/n] y

Thanks for using MariaDB!
Chú ý: Lưu lại mật khẩu
Bước 6: Cấu hình NGINX
6.1. Mở file config của NGINX để chỉnh sửa cấu hình:
nano /etc/nginx/nginx.confChỉnh worker_processes bằng với số CPU trên server của bạn
6.2. Cấu hình nginx virtual hosts
nano /etc/nginx/conf.d/default.confSửa lại nội dung file như sau
############

server {

    listen       80 default_server;

    server_name example.com;


    location / {

        root   /var/www/html;

        index index.php index.html index.htm;

        try_files $uri $uri/ /index.php?q=$uri&$args;

    }


    error_page  404     /404.html;

    location = /404.html {

        root   /usr/share/nginx/html;

    }


    error_page   500 502 503 504  /50x.html;

    location = /50x.html {

        root   /usr/share/nginx/html;

    }


    # pass the PHP scripts to FastCGI server listening on 127.0.0.1:9000

    #

    location ~ \.php$ {

        root           /var/www/html;

        fastcgi_pass 127.0.0.1:9000;

fastcgi_index index.php;

        fastcgi_param  SCRIPT_FILENAME   $document_root$fastcgi_script_name;

        include        fastcgi_params;

    }

}

############
Lưu lại và restart dịch vụ để áp dụng cấu hình mới bằng lệnh
systemctl stop nginx.service

systemctl start nginx.service
Bước 7: Cấu hình PHP-FPM
7.1. Chỉnh sửa user và group
nano /etc/php-fpm.d/www.conf

user = nginx

group = nginx
7.2. Restart dịch vụ php-fpm
systemctl stop php-fpm.service

systemctl start php-fpm.service
Bước 8: Cấu Hình firewalld
Mặc định trên CentOS 7 dịch vụ tường lửa được bật và chỉ mở 1 cổng duy nhất là SSH. Để mở cổng truy cập web (http,https) ta làm như sau:
firewall-cmd --permanent --add-port=80/tcp

firewall-cmd --permanent --add-port=443/tcp

firewall-cmd –reload
Bước 9: Kiểm tra
Chạy một file info.php để kiểm tra có Web Server có hoạt động hay không
nano /var/www/html/info.phpThêm đoạn sau và lưu lại
<?php

phpinfo();

?>
Mở trình duyệt web nhập địa chỉ server như sau: http://<ip-address>/info.php