
WooCommerce Endpoints là gì?
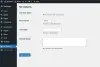
Kể từ khi phiên bản WooCommerce 2.6, Woo có thêm trang Tài Khoản được xuất hiện dưới dạng một menu dọc gồm các liên kết hiển thị dữ liệu tương ứng ở bên phải. Đây chắc chắn là một trải nghiệm người dùng tốt hơn so với việc hiển thị dữ liệu liên tục trước đây.
Endpoint là một phần bổ sung trong URL của website được phát triển để giúp hiển thị nội dung khác nhau ở hiện tại.
Ví dụ:
Trong trang "Tài Khoản" của bạn với URL là "example.com/my-account", khi bạn click vào tab "Sửa tài khoản" bạn sẽ chuyển đến trang "example.com/my-account/edit-account" và sau đó nó sẽ hiển thị trang "Sửa tài khoản" thay cho trang "Tài khoản" lúc đầu.
Điều này cho phép chúng ta hiển thị các nội dung khác nhau mà không cần tạo nhiều trang và shortcode, đồng thời giảm số lượng nội dung cần cài đặt.
Thay đổi vị trí của các menu Tài Khoản trong WooCommerce
Thứ tự mặc định ban đầu của các mục trong menu Tài khoản có thể được xem trong
/wp-content/plugins/woocommerce/includes/wc-account-functions.php
/**
 * Get My Account menu items.
 *
 * @since 2.6.0
 * @return array
 */
function wc_get_account_menu_items() {
 return apply_filters( 'woocommerce_account_menu_items', array(
 'dashboard' => __( 'Dashboard', 'woocommerce' ),
 'orders' => __( 'Orders', 'woocommerce' ),
 'downloads' => __( 'Downloads', 'woocommerce' ),
 'edit-address' => __( 'Addresses', 'woocommerce' ),
 'payment-methods' => __( 'Payment Methods', 'woocommerce' ),
 'edit-account' => __( 'Account Details', 'woocommerce' ),
 'customer-logout' => __( 'Logout', 'woocommerce' ),
 ) );
}
Bạn có thể thay đổi vị trí trên bằng cách sử dụng woocommerce_account_menu_items filter như
<?php
/*
* Change the order of the endpoints that appear in My Account Page - WooCommerce 2.6
* The first item in the array is the custom endpoint URL - ie http://mydomain.com/my-account/my-custom-endpoint
* Alongside it are the names of the list item Menu name that corresponds to the URL, change these to suit
*/
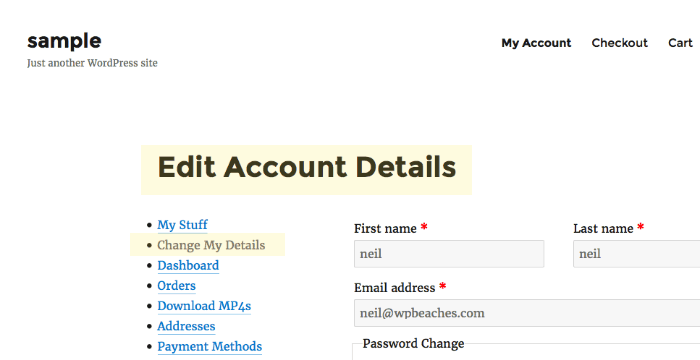
function wpb_woo_my_account_order() {
$myorder = array(
'my-custom-endpoint' => __( 'My Stuff', 'woocommerce' ),
'edit-account' => __( 'Change My Details', 'woocommerce' ),
'dashboard' => __( 'Dashboard', 'woocommerce' ),
'orders' => __( 'Orders', 'woocommerce' ),
'downloads' => __( 'Download MP4s', 'woocommerce' ),
'edit-address' => __( 'Addresses', 'woocommerce' ),
'payment-methods' => __( 'Payment Methods', 'woocommerce' ),
'customer-logout' => __( 'Logout', 'woocommerce' ),
);
return $myorder;
}
add_filter ( 'woocommerce_account_menu_items', 'wpb_woo_my_account_order' );Ở đây bạn cũng có thể xóa menu trong trang Tài Khoản bất kỳ nếu muốn.
Một hạng chế nếu bạn thay đổi title ở đây sẽ không thể thay đổi được title trong entry-title vậy nên có một cách thay đổi title hiệu quả hơn là cách ở trên.
Thay đổi Tiêu đề của menu Tài Khoản trong WooCommerce
Một cách đơn giản là dùng filter the_title và in_the_loop, như ví dụ bên dưới:
<?php
/*
 * Change the entry title of the endpoints that appear in My Account Page - WooCommerce 2.6
 * Using the_title filter
 */

function wpb_woo_endpoint_title( $title, $id ) {

	if ( is_wc_endpoint_url( 'downloads' ) && in_the_loop() ) { // add your endpoint urls
		$title = "Download MP3s"; // change your entry-title
	}

	elseif ( is_wc_endpoint_url( 'orders' ) && in_the_loop() ) {
		$title = "My Orders";
	}

	elseif ( is_wc_endpoint_url( 'edit-account' ) && in_the_loop() ) {
		$title = "Change My Details";
	}
	return $title;
}

add_filter( 'the_title', 'wpb_woo_endpoint_title', 10, 2 );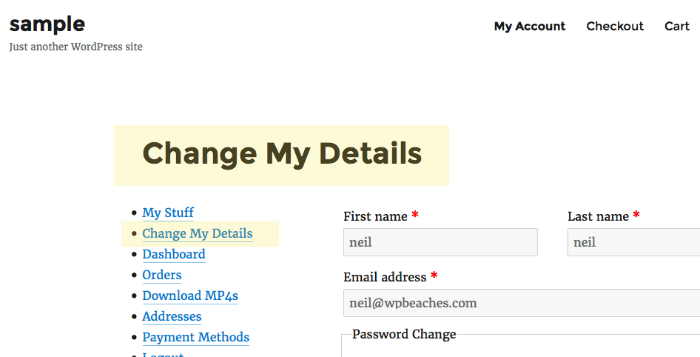
Cách thêm một menu Tài Khoản trong WooCommerce
Đây là snippet thêm một item vào trong menu Tài Khoản của WooCommerce giúp bạn bổ sung bất cứ thứ gì vào trang Tài Khoản dễ dàng.
<?php


/*
 * Add custom endpoint that appears in My Account Page - WooCommerce 2.6
 * New URL below as Claudio changed his github username
 * Ref - https://gist.github.com/claudiosanches/a79f4e3992ae96cb821d3b357834a005#file-custom-my-account-endpoint-php
 */


class My_Custom_My_Account_Endpoint {

	/**
	 * Custom endpoint name.
	 *
	 * @var string
	 */
	public static $endpoint = 'my-custom-endpoint';

	/**
	 * Plugin actions.
	 */
	public function __construct() {
		// Actions used to insert a new endpoint in the WordPress.
		add_action( 'init', array( $this, 'add_endpoints' ) );
		add_filter( 'query_vars', array( $this, 'add_query_vars' ), 0 );

		// Change the My Accout page title.
		add_filter( 'the_title', array( $this, 'endpoint_title' ) );

		// Insering your new tab/page into the My Account page.
		add_filter( 'woocommerce_account_menu_items', array( $this, 'new_menu_items' ) );
		add_action( 'woocommerce_account_' . self::$endpoint .  '_endpoint', array( $this, 'endpoint_content' ) );
	}

	/**
	 * Register new endpoint to use inside My Account page.
	 *
	 * @see https://developer.wordpress.org/reference/functions/add_rewrite_endpoint/
	 */
	public function add_endpoints() {
		add_rewrite_endpoint( self::$endpoint, EP_ROOT | EP_PAGES );
	}

	/**
	 * Add new query var.
	 *
	 * @param array $vars
	 * @return array
	 */
	public function add_query_vars( $vars ) {
		$vars[] = self::$endpoint;

		return $vars;
	}

	/**
	 * Set endpoint title.
	 *
	 * @param string $title
	 * @return string
	 */
	public function endpoint_title( $title ) {
		global $wp_query;

		$is_endpoint = isset( $wp_query->query_vars[ self::$endpoint ] );

		if ( $is_endpoint && ! is_admin() && is_main_query() && in_the_loop() && is_account_page() ) {
			// New page title.
			$title = __( 'My Stuff', 'woocommerce' );

			remove_filter( 'the_title', array( $this, 'endpoint_title' ) );
		}

		return $title;
	}

	/**
	 * Insert the new endpoint into the My Account menu.
	 *
	 * @param array $items
	 * @return array
	 */
	public function new_menu_items( $items ) {
		// Remove the logout menu item.
		$logout = $items['customer-logout'];
		unset( $items['customer-logout'] );
		// Insert your custom endpoint.
		$items[ self::$endpoint ] = __( 'My Stuff', 'woocommerce' );

		// Insert back the logout item.
		$items['customer-logout'] = $logout;

		return $items;
	}

	/**
	 * Endpoint HTML content.
	 */
	public function endpoint_content() {
		 ?>

		<div class="woocommerce-MyAccount-content">

			<p>Hello World! - custom field can go here</p>

		</div>

		<?php
	}

	/**
	 * Plugin install action.
	 * Flush rewrite rules to make our custom endpoint available.
	 */
	public static function install() {
		flush_rewrite_rules();
	}
}

new My_Custom_My_Account_Endpoint();

// Flush rewrite rules on plugin activation.
register_activation_hook( __FILE__, array( 'My_Custom_My_Account_Endpoint', 'install' ) );
Vì vậy, trong đoạn code ví dụ ở trên là một class đơn giản để bạn thêm vào bất kì đâu bạn muốn, bạn cũng có thể thay đổi title, slug,... trong class nay.
Nếu bạn cần thêm nội dung vào trong Endpoint bạn có thể sử dụng đoạn code dưới:
add_action( 'woocommerce_account_my-stuff-endpoint_endpoint', 'gc_custom_endpoint_content' );
/**
 * Custom Endpoint content
 */
function gc_custom_endpoint_content() {
 echo 'custom end point content goes here';
}
Chú ý: Action ở trên sử dụng cấu trúc woocommerce_account_{your-custom-url}_endpoint để can thiệp và hiển thị nội dung bạn cần .